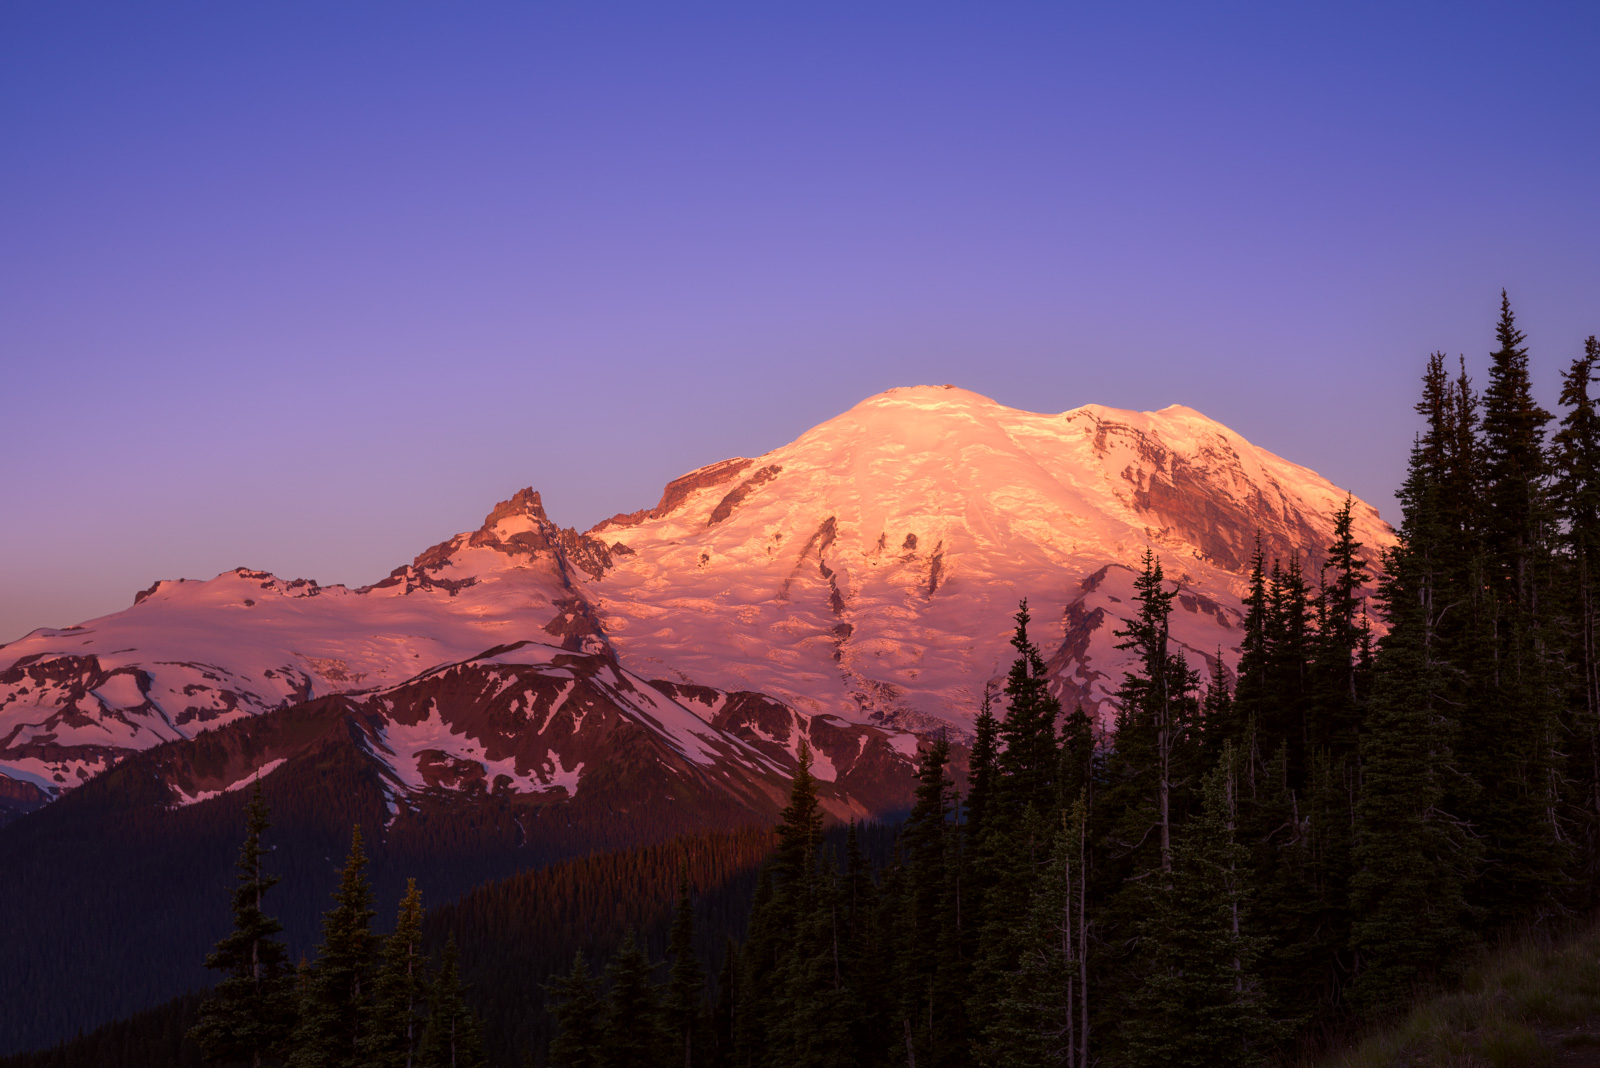
Ruined Trip?

I headed out to Washington State for the North Cascades and Mount Rainier. People warned me about the weather but I was going in mid July so I'll thought I'll be fine. Turns out living in Georgia has kind of spoiled me.

View from the top of Table Mountain, in the Mount Baker Wilderness. You're looking at Mount Shuksan under cloud cover.

View from the top of Table Mountain, in the Mount Baker Wilderness. You're looking at Mount Shuksan under cloud cover.

The weather hasn't been bad per say, it's just been killing me exactly at sunset, sunrise and in the night.

One minute I have clear skies and then wham, clouds everywhere, and not the good kind of clouds either, where're talking about thick heavy clouds that the sun has no hope of shining through.

First there was my easy trips to Artist Point and Table Mountain on the Mount Baker highway. I knew going in, there was going to be a lot of clouds but who cares, my trip just started and it wasn't like it was a long hike.The clouds mostly covered the peak, which is not what I wanted and I got a pretty lame picture.


This is as clear as it got at night on the skyline divide trail. The peak of Mount Baker is completely hidden and the prominent peak to the left is Grant Peak, which is east of the true summit.

Then came the skyline divide trail, which gets nice and close to Mount Baker. I wanted to get sunset, the night and then sunrise all while solo camping up there.

While hiking up there things were what I would call partially cloudy. Once I got camp setup, on I think the fifth knoll of the trail, things got decidedly worse. A huge amount of clouds swept in for sunset. Oh well, I thought it should clear up some at 2 am, like the weather report said, so I went to sleep with the alarm set to 2 am. Nope, it turns out the weather on top of mountains is unpredictable - who would have thought? I did manage a decent picture of the clouds sweeping over Grant Peak, along the east ridge of Baker though.


Well that was that, hopefully Rainier would turn out better. I headed out to Sunrise at the north entrance, hoping to get some Milky Way shots overlooking Rainier. The weather forecast was for clear skies and when I got there, clear and blue it sure was.

My view from Burroughs Mountain. I could barely see the camera in front of me.

My view from Burroughs Mountain. I could barely see the camera in front of me.

My plan was to hike to a half mile shy of Burroughs Mountain and take a shot on the trail with the almost sheer cliffs overlooking the volcano. I set up both cameras; one for stills and one for a time-lapse with a good 2 hours before sunset. Then I saw the first clouds about half way up the top of Rainier. No big deal, I thought…...

Looking back towards the Sunrise visitors center, a big wave of misty clouds looked to be rolling in. The weather report was for partial cloudy skies at sunset and clear skies at around 1 am, so I was still holding out hope that they would just pass. You can see what the visibility actually looked like on the right.

The weather report for clear skies at around 1 am held water though and I got some pretty good moonlit, milky way and sunrise shots.

This is the kind of view you can expect once the clouds dissipate, or in my case move lower, leaving an amazing bank of clouds below me.

That seemed like the only good weather I got for the whole week. For the next sunset I planned on going to Mount St Helens. Reports were for a partial cloudy sky which would clear up later in the night.

Driving up there I saw a pretty clear St Helens with some clouds. A big bank of clouds rolled in at what seemed like on cue at sunset. I got some OK shots looking at the other direction from the volcano but at that point I was feeling really frustrated and didn’t stick around for the night.

Fogged out Mt Rainier, at Paradise.

Fogged out Mt Rainier, at Paradise.

The final place I planned on going; Paradise, on the south entrance of Mount Rainier National Park, turned out to be the biggest bust. Driving up there I could again see the peak clearly but as you can guess, once I got there it was completely under cloud cover. I waited one hour after sunset to see if would dissipate but once it didn’t, I hiked back down to the trail head parking lot and thought I would wait it out in the car.

As 1 am rolled around, the visibility was even worse. Then 3 am ticked by and still no luck. I decided to pack it in and just drive back at that point, as I doubted sunrise would be clear (I did double check the visitor center webcam to check I made the correct decision - I did - big whoop).


So that was the trip, mostly bad, but that’s looking at it right after the Paradise let down. The skyline divide trail, along the ridge line towards Mount Baker was still very cool, even though there were clouds covering most of the peaks. On top of that, I had a very nice night at Sunrise at Mount Rainier, looking at the stars. I guess that’s the pacific northwest; lots of gloomy clouds but amazing once you get lucky enough to peak past them.

Jekyll Island, GA & The Milky Way

I took the plunge and drove 4-5 hours to Jekyll Island, just north of Jacksonville.

I wanted to go and catch sunset and then get some Milky Way action after astronomical twilight. Storms during the past couple of weekends have put a stopper on going though. I took a risk this weekend even though there was expected heavy clouds until the middle of the night. With the moon also rising at 11:45pm, I was cutting it really close with a sky that would stay clear and be moon free. I got a lucky last time I went to Blood Mountain, so I thought what the heck.

The main reason why I wanted to go was because of Driftwood Beach, which has bare trees and washed up logs all along the beach. It’s also pretty dark down there, well compared to other parts of the East Coast. Looking south down Jekyll Island, would be the darker Cumberland Island (which is completely undeveloped, being under National Park management), so looking south, towards the Milky Way should show little light pollution.

Well that was the plan…...The one thing I forgot to take into account was how close Driftwood Beach was to Saint Simons Island, which is anything but dark. On top of the light pollution there was also the lighthouse on St Simons, that intermittently lit up the beach. I’m kind of getting ahead of myself though.

For sunset, I did plan to go to the north part of the island, which has some driftwood on the beach but more importantly would allow me to get the setting sun back-lighting the driftwood, as it was setting towards the north-west. While I was walking up there though I came across this open field with an amazingly green marsh and I thought I’ll pass up the driftwood shot (I was going to to shot it with the Milky Way anyway).

Don’t know if I was too happy with those big, stormy looking clouds being there. Don’t get me wrong, it made the sunset picture look great but I came for the Milky Way, and those clouds did look pretty ominous.

Once blue hour rolled around, I got my camera set up next to a cool piece of driftwood overlooking the rising Milky Way. With high tide coming in at around the time of the moon rise, I did have to move the camera but I got a nice blue hour shot, with some nice saturated colors and a just visible galactic core.

That stretch of yellow light on the water is from the lighthouse at St Simons and the red glow on the water is me light painting with my headlamp.

I did have to move the camera pretty soon after - tides move quick! Once astronomical twilight hit I got some decent shots with the Milky Way and it’s galactic core very much visible and on full display. All the light pollution from Saint Simons, did give them a nasty white-orange glow. I got rid of most of it with some light painting, using a flashlight with a blue gel. I even made use of the lighthouse; I waited for it flash towards the water so that it lit up the waves perpendicular to my flashlight.

You can see the Milky Way here in it's full glory.

Overall pretty happy, well I was till I had to drive another 5 hours back, soaked from the knee down.

Macro Fantastic

I finally got a macro lens a couple of months ago and I’m starting to really like it. Not so much the lens but taking macro shots. Why? Well, it requires not really going anywhere far. All I have to do is find a flower or plant (which they’re plenty of in Atlanta) and start shooting.

Think that's a beetle.

I usually just stroll out a hour or two before sunset and find a flower and start shooting. I haven’t yet had the patience to wait for insects and then hope for a good pose but I have some decent flower shots. Nothing groundbreaking but hey, they didn’t require that much effort.

The reason why I really like it, is that doesn’t really require planning and long car rides and such. So when I’m feeling lazy but bored, it fills a nice gap. Plus, it allows me to take more photographs and learn a couple of things, like you can’t focus stack a flower with any hint of a wind.


So what lens have I been using? The continually back-ordered Tokina 100mm f/2.8. It seems pretty sharp to me, though I’m looking at 26 megapixel files, so don’t take my word if you’re using a 50 megapixel Canon behemoth. The Tokina is pretty nicely made, considering the price and I’m glad I didn’t buy the Nikon 105mm f/2.8. Is it also 1:1 magnification (1 inch in real life will be inch on the sensor), which is what swayed me over the older Nikon macro lens.

There are three cheap ways of getting into macro photography:


More of your standard flower shot.

I won’t go into which marco lens is the best or best value, but the two above are cheap, good, are 1:1 magnification and have a good working distance, so you don’t have to get super close to your subject and block out all the light.

With the extension tubes you can either go smart (with auto-focus) or dumb (without). I did the “and/or” for the them because there’s nothing stopping you from using them on macro lens! Instead of the 1:1 magnification, you could get 2:1, so 1 inch in real life would be 2 inches on the sensor - welcome to the world of abstract macro photography. Of course you can use the extension tubes on a non-macro lens to get a higher magnification than your normal lens - even if it’s not 1:1, it’s a start and it’s cheap.

An abstract, shallow depht of field macro shot.

Peach tree bloom.

I’m having fun shooting macro and if you haven't started, hopefully I’ve shown you that it doesn't have to be expensive to get going.